
Monarch Butterfly Tutorial
Jun 05, 2024

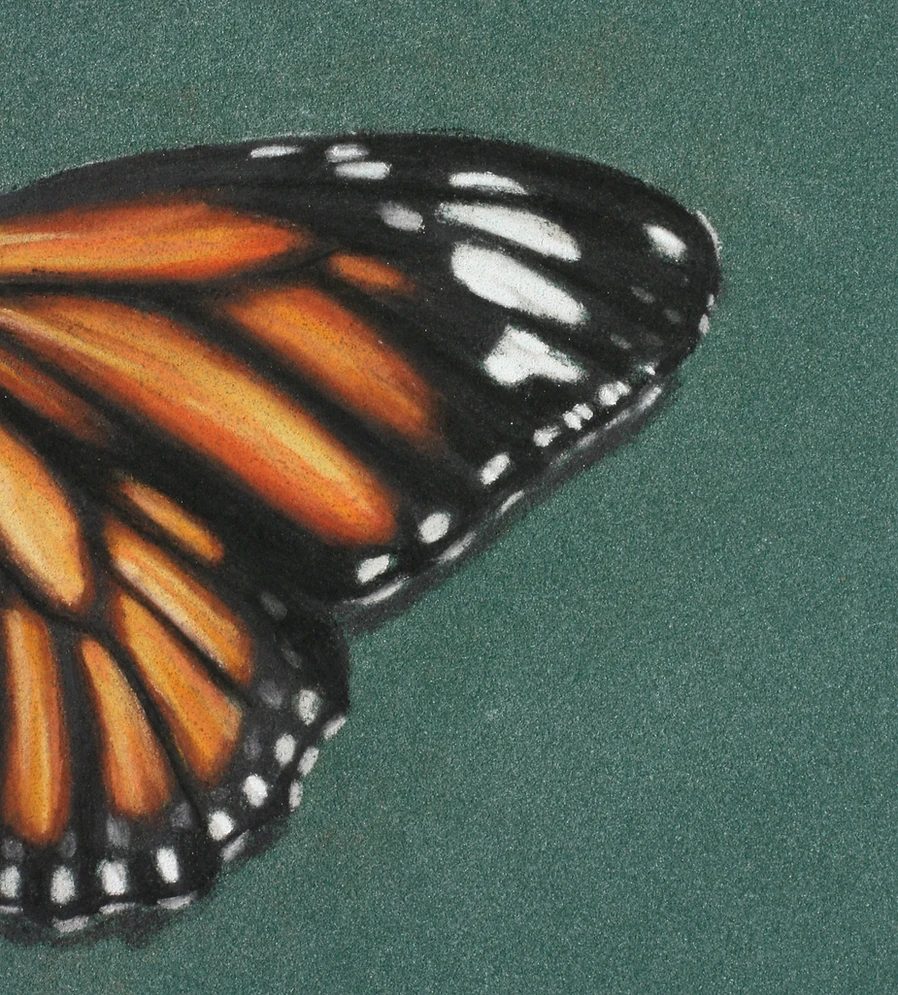
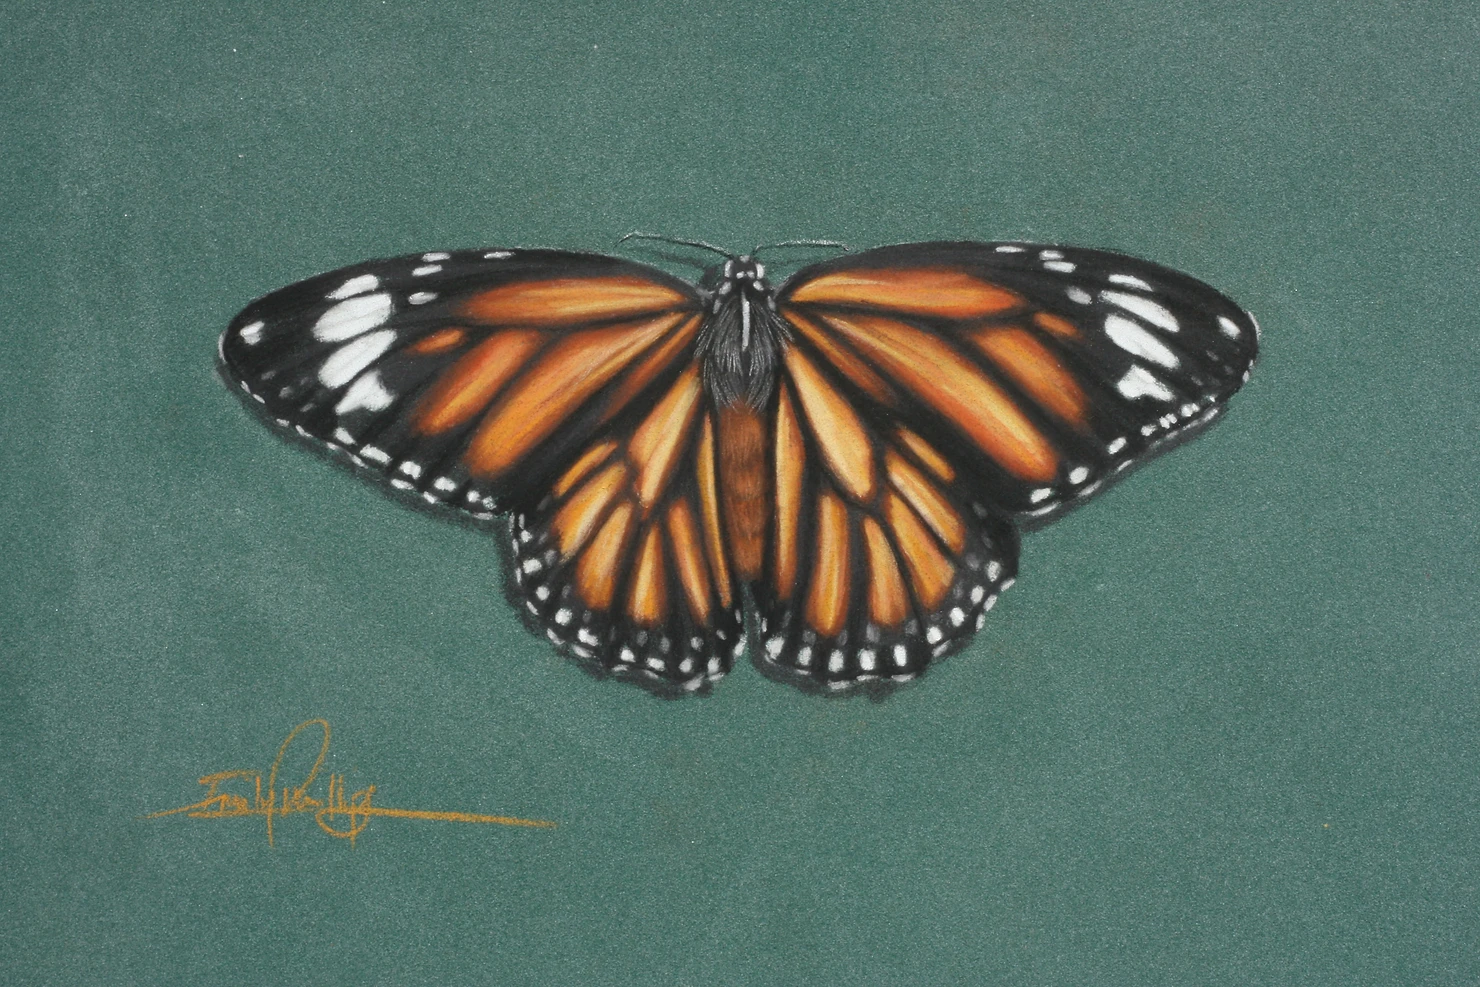
Pastel Pencil Monarch Butterfly
Another Friday and another tutorial to keep you drawing; to keep you from doing those tedious jobs and to try and retain your sanity, or at least that’s why I draw. I hope you’re all staying well in this lockdown, it’s been a glorious week here in Buckinghamshire and the butterflies are out in full force, so it’s the perfect time for this little online art class.
I have been receiving lovely feedback on the tutorials so far and thank you for all the work you’ve been sending into me, it’s great to see! In response to this, I have set up a Facebook community group for you all, do feel free to join it here. I will post links to my latest tutorials and other learning resources on the group, but also provide free feedback on your work. The idea is to build an online community, much like an art club, to keep you all motivated and inspired throughout the lockdown, I’d love it if you’d take part.
As always, Paper Story are helping you out with the pencils for this course by giving you 30% off on the official list, thank you so much, Angie! Just to be clear, I don’t take a commission from them and am not sponsored by the manufactures. Paper Story are my usually art shop stop as I love their products and service, they’re also a small business just like me and I think it’s important to support each other when we can. Here’s the link.
If you already have the set for the dog’s eye tutorial, then you don’t need to purchase any new pencils for this one. Depending on which pack of paper you purchased, you may also already have the deep green pastel mat as well, equally, the dark blue would work well for this too.
Ready to get stuck in? Then let’s go!
Materials You’ll Need
As always, I am not sponsored by any of the materials listed below. These are simply the supplies I enjoy using and would advise you to try; it makes the whole process easier that way. The whole pencil pack will be available from Paper Story, as I’ve said above. You can also buy individual pencils from Paper Story if you’re only short of the odd one.
Pencils
Faber Castell 283 – Burnt Sienna
Faber Castell 187 – Burnt Ochre
Faber Castell 186 – Terracotta
Faber Castell 109 – Dark Chrom Yellow
Faber Castell 184 – Dark Naples Ochre
Faber Castell 230 – Cold Grey I
Faber Castell 181 – Paynes Grey
Faber Castell 199 – Ivory Black
Faber Castell 177 – Walnut Brown
Faber Castell 270 – Warm Grey I
Faber Castell 101 – White
Faber Castell 102 – Ivory
Pastelmat Paper – Dark Green
Crystal (wax) Paper (this is included in the pads of pastelmat paper; however, if you are buying individual sheets of pastelmat, click here to order the crystal paper.)
Putty Rubber
Craft knife and sanding paper to sharpen (learn how to do this here.)
The reference I used for this butterfly was sourced from a free reference site. There are plenty available with a quick Google search.
Step 1
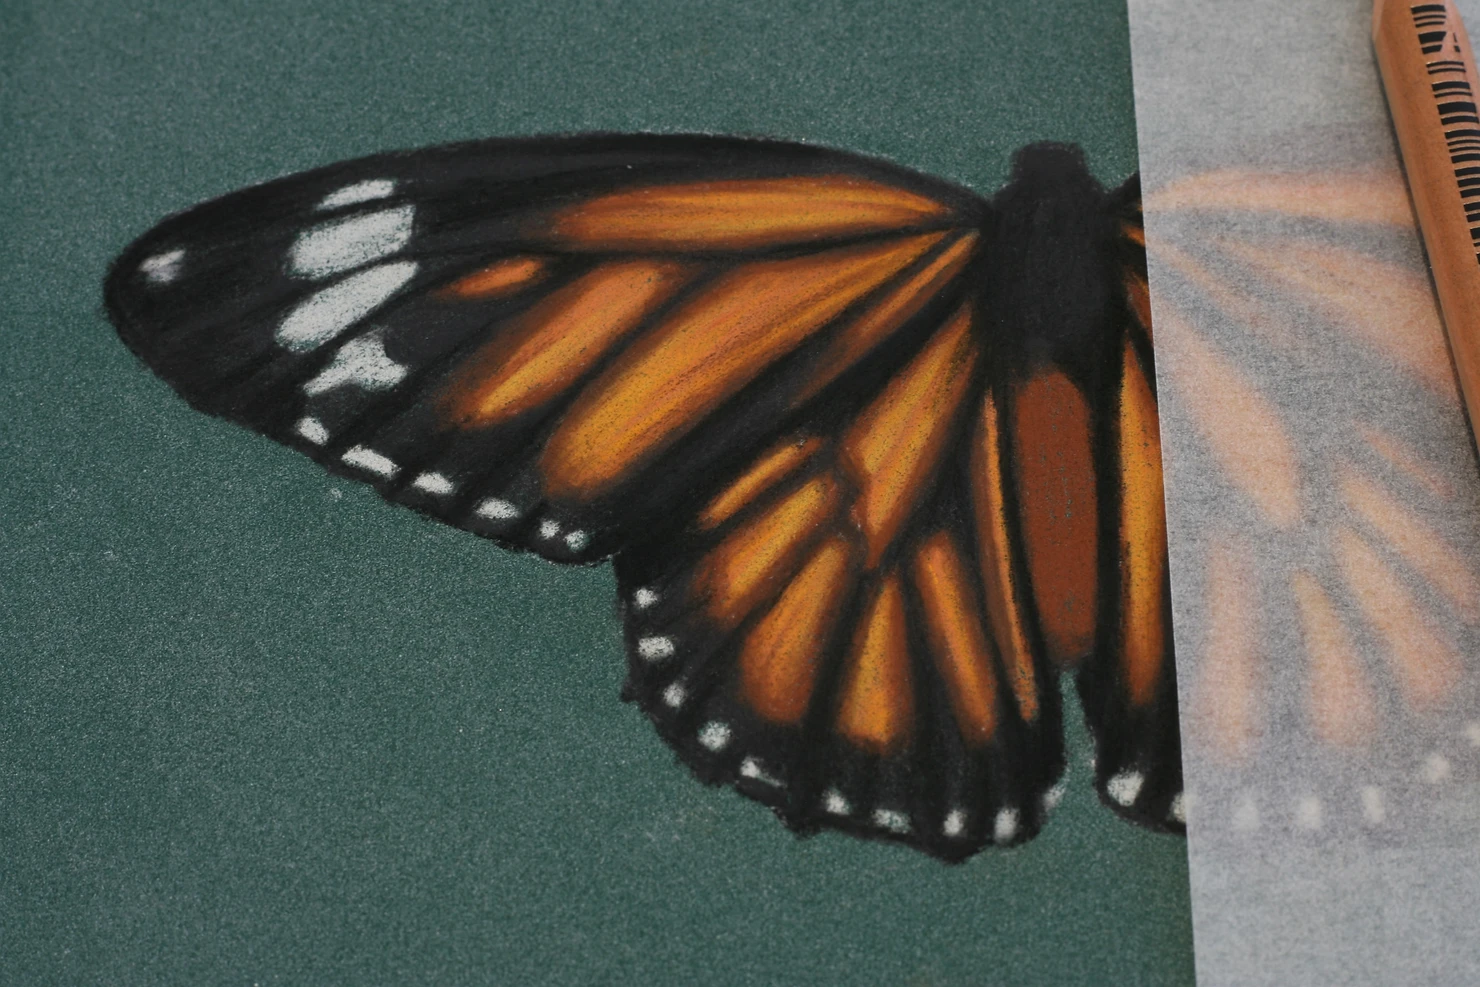
A tip for people who are learning to paint and draw; if you have a beautiful vibrant colour – like the orange of the Monarch Butterfly – right next to a hard edge (here it is caused by the black) it is usually best to soften the blow. This is all to do with edge management. I won’t bore you with it too much; however, the more ‘found’ edges (simply means: sharp edge), you have in a painting, the more fragmented and distracting it becomes. It’s usually best to have a variety of softer edges and save the sharp ones for a focal point (like the reflection in an eye). This is a great thing to keep in mind while you draw and paint, it will really take your art to the next level.
If you need to know how I transfer an image, you can find a brief explanation in my previous post… I must, must, must get around to doing a proper blog post about it for you all!
So, that is why we are beginning with the burnt sienna Faber Castell (FC) 283 and using it to outline all of the orange areas of the wings. It’s really going to help us bring the black and the orange together later on.
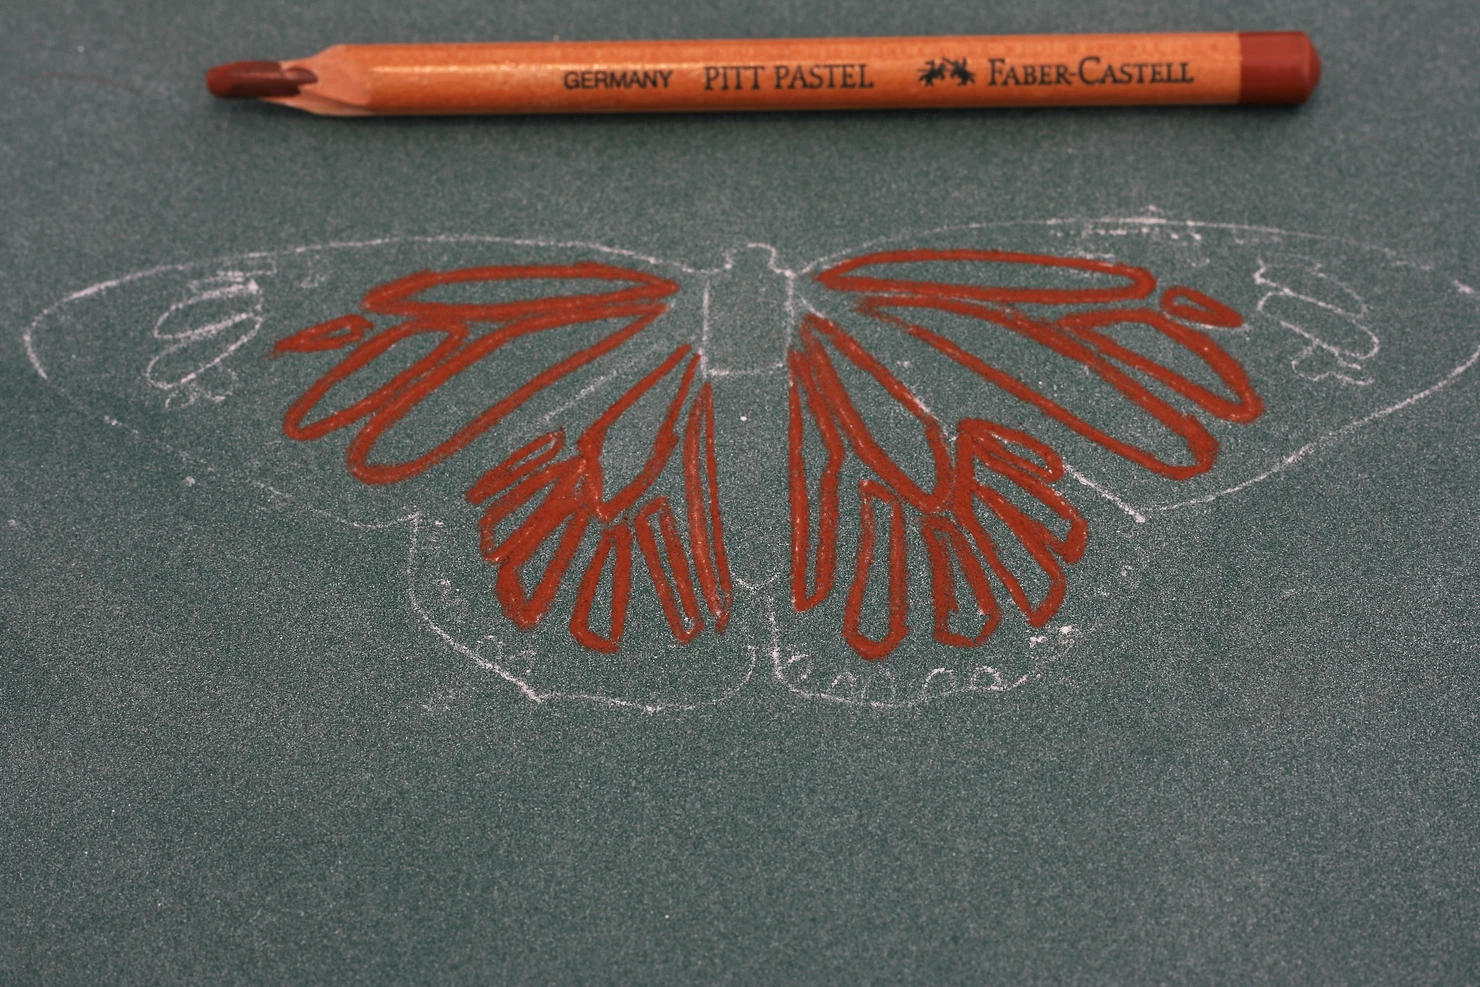
How to Draw a Monarch Butterfly Step 1
Step 2
Now that the scary bit is out of the way and the first marks are down, we can get cracking with the brighter colours. You may be wondering why on earth I have chosen a green background for this orange butterfly. It comes down to some pleasing colour theory, as green and orange are part complementary colours. I always think ‘complimentary’ is a slightly nonsensical way of describing this colour relationship, but, in essence, it means that they bounce and clash against each other as they are near opposites on a colour wheel. Blue and orange are true complementary colours, but, this butterfly is orange-red and I thought the deep green would work nicely for it. Babbling over.
Take the striking orange FC 187 burnt orange and with firm pressure, colour the darker inside edges of the pattern, as seen below. I have left the brighter centres for our lighter colours to come.
You’ll also notice that I am working in the direction of the wings; they have a beautiful soft drape to them which we need to capture with long steady strokes of the pencil. Try to move the pencil before it makes contact with the page and lift it whilst still moving. This motion will keep the edges soft and prevent blotches where you’ve pressed too hard.
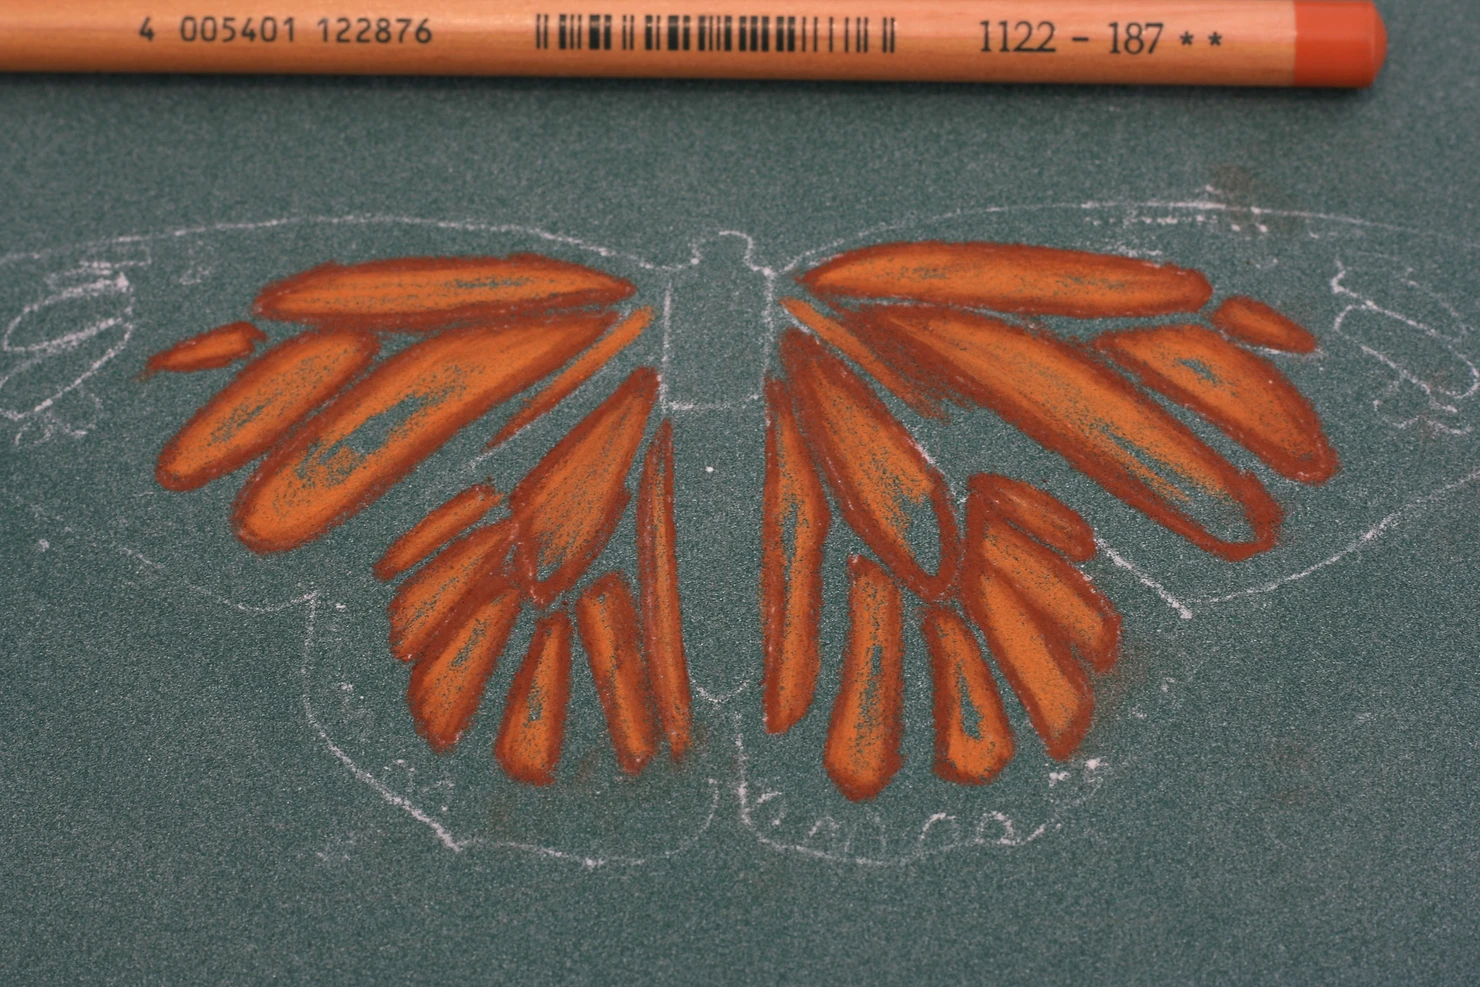
How to Draw a Monarch Butterfly Step 2
Step 3
Using that same motion for shading as above, (to continue the idea of soft folds in the wings), fill in the remainder of the orange with peach-orange FC 186. This is a slightly punchier pencil and we are slowly increasing the contrast on this butterfly which is visually exciting and interesting.
If you are looking at yours and thinking ‘hmm, it doesn’t look quite the same’, try checking the following as you move through the tutorial:
- Have you pressed hard enough, and gone dark enough?
- Have you filled in the tooth of the card (if the tooth is not filled, you will see a grainy effect), or is there a lot of green coming through?
- Are your layers of pastel joining together softly, or are you only colouring up to the line of the previous colour and not joining them together?
- Are you drawing in long, soft, sweeping lines to create a flow throughout the wings, they should fan out from the body evenly.
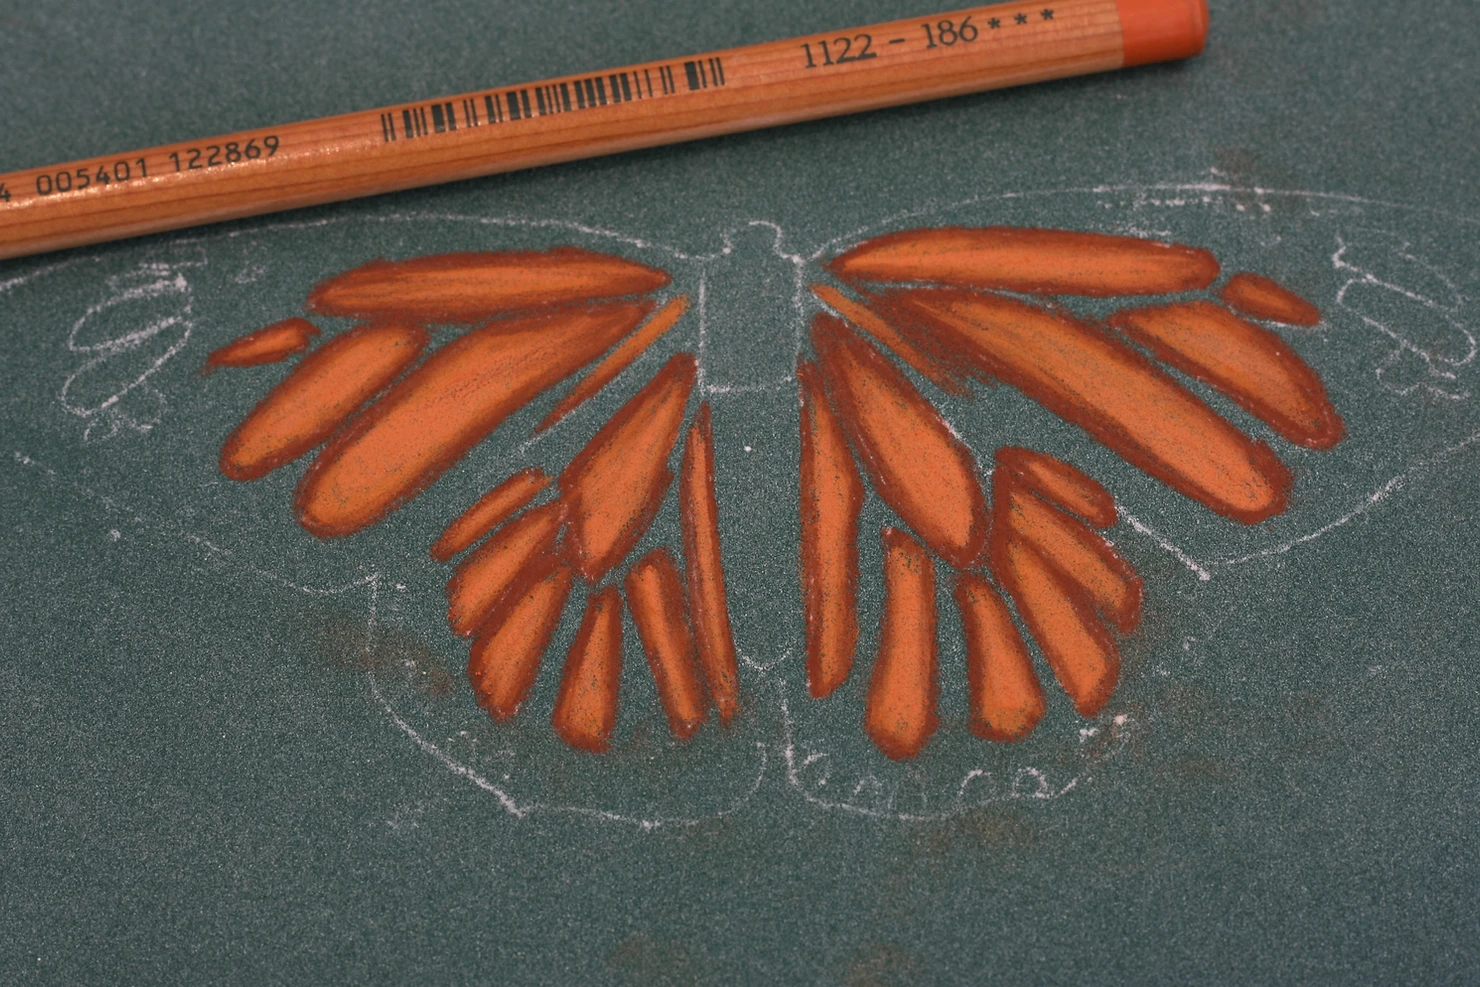
How to Draw a Monarch Butterfly Step 3
Step 4
I’m hoping that as we are moving one pencil at a time with this tutorial, you will be keeping up and not getting lost. It’s worth you while to take time with every step of this painting as I’m afraid a good study is an accumulation of time, observation and accuracy.
We are going to add more dimensionality to the orange now, but, a word before we do which may help. We are aiming to create soft drapes, as I keep saying; therefore, we need to have soft streaks of light and darks running through the wings and following the fall of the wings. What you need to avoid is making the orange shapes bright in the middle, as though they are spherical. This will cause them to look like raised bumps on the wings and is not a good look!
With that in your mind, take the neon orange FC 109 and carefully add this to the subtle highlights on the wings.
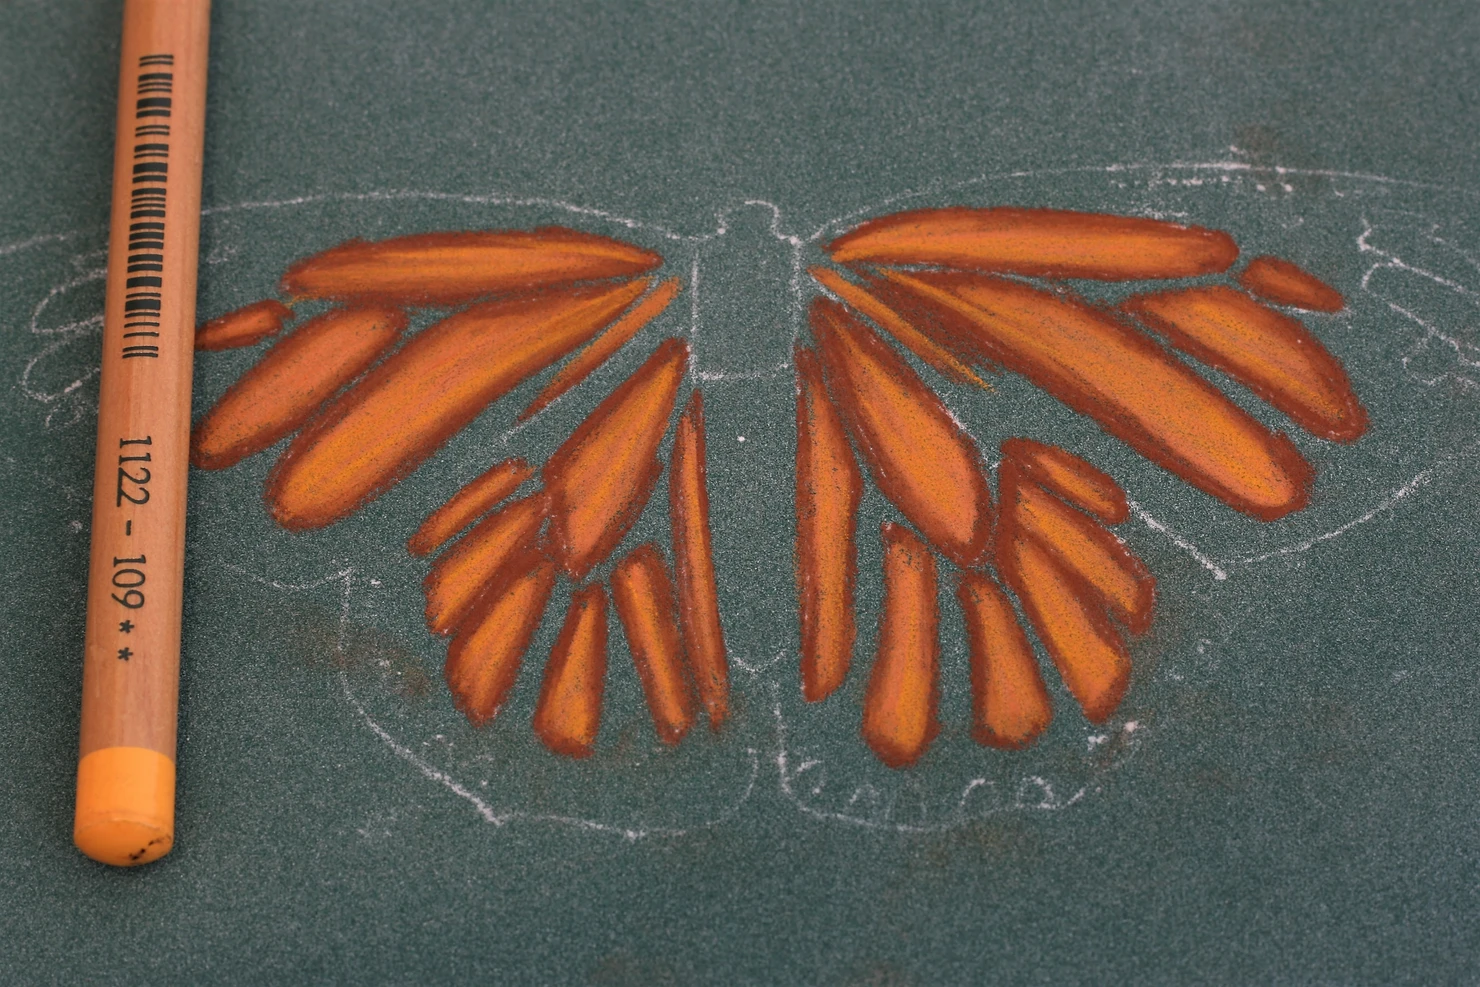
How to Draw a Monarch Butterfly Step 4
Step 5
We are almost done with the orange of the wings, just one last little flourish to go! It’s a good time to go back and check your edges for big blobs of the green card showing, get rid of it if you find some.
To finish the orange, take the bright yellow FC 184. It’s a lovely rich yellow and will bring out the top of each wave very nicely, so add it to the brightest parts of the orange patterns.
In summary, what we have done here is gone from a brownish red, (arty people would call it a warm, dark, desaturated red), to intense orange, (or, a saturated mid-tone warm orange), to a neon-bright orange (high-value cool orange), and finally to yellow (high value, high saturation, warm orange). In essence, fancy stuff aside, we are taking the colours through a section of the colour wheel slowly from red to yellow. Each step towards yellow gets a little lighter and brighter. The lightest and brightest parts of your painting will jump forwards towards you and really stand out, hence the highlight.

How to Draw a Monarch Butterfly Step 5
Step 6
With those juicy segments of orange down, you will be surprised how quickly the rest begins to come together. That’s why I love drawing butterflies: it’s instant gratification!
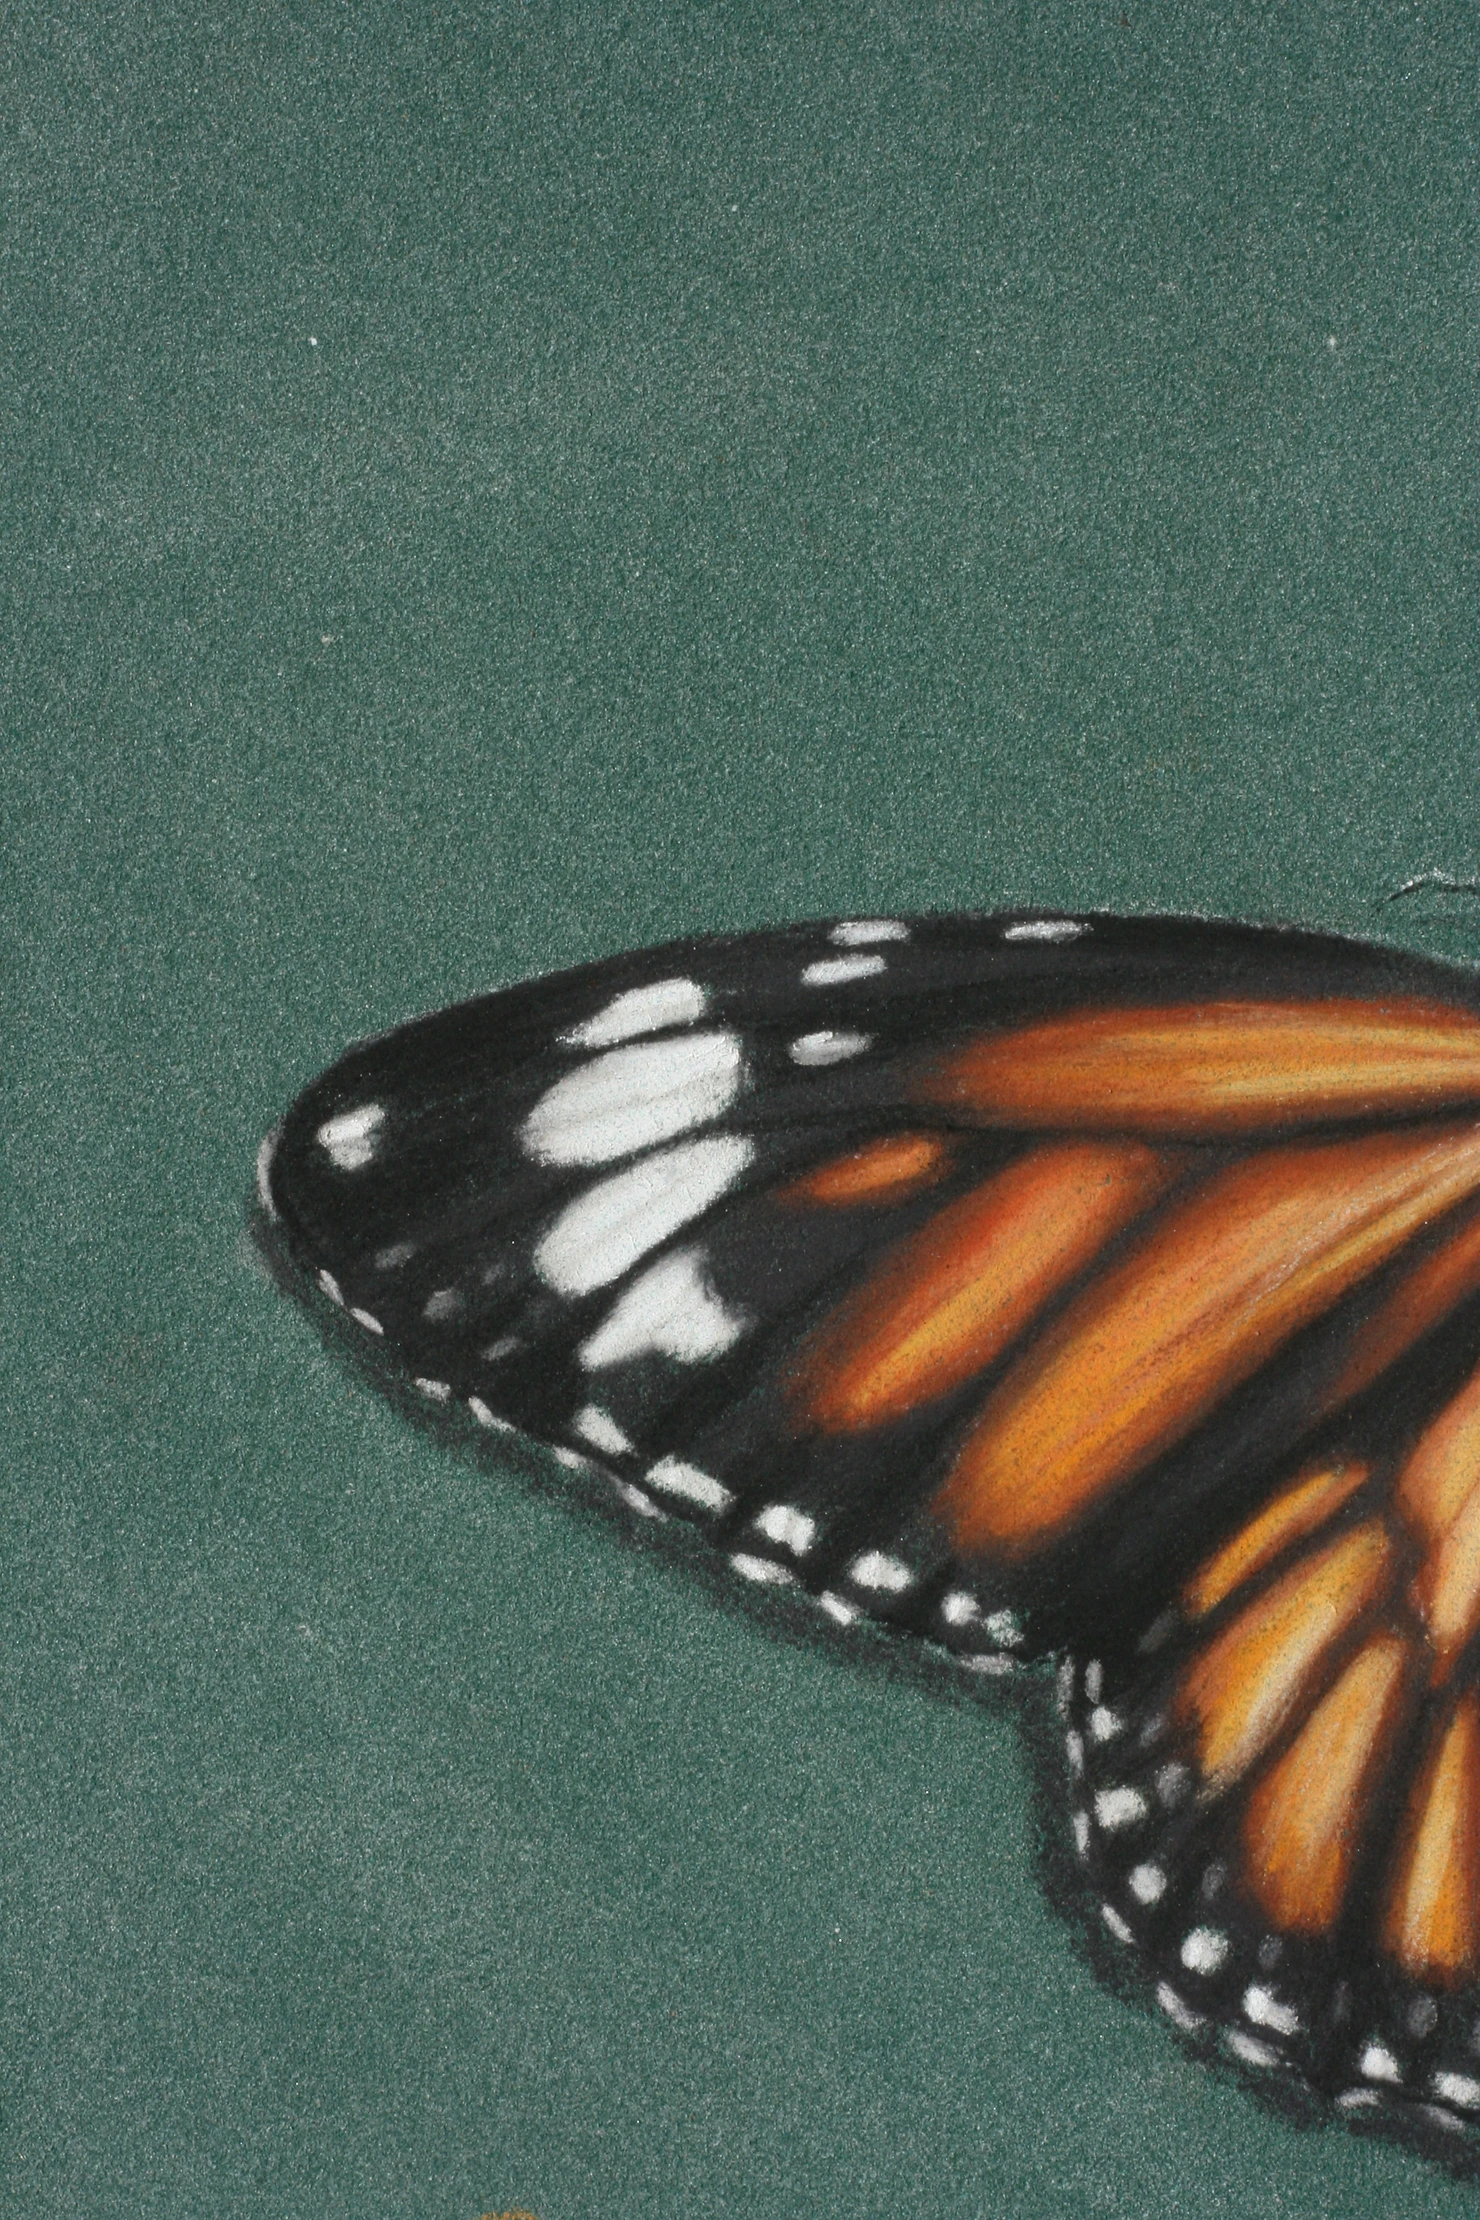
Sharpen your light grey FC 230, it doesn’t have to be needle-sharp but you want accuracy for the next step. Identify and colour, with firm pressure to see off the green card, each tiny white mark on the wings. Now, you can make this bit up and disregard your photo here. Why make life confusing if there are a lot of marks to place and colour? Just try to make sure both wings match near enough.
Don’t worry about the black in the photo below. You haven’t missed a step, I just forgot to take a photo as I became engrossed in the work!

How to Draw a Monarch Butterfly Step 6
Step 7
Now might be a good time to give your eyes a rest, go and grab yourself a cup of tea and take five, it will help you draw.
Now that your eyes are refreshed and your caffeine equilibrium restored, let’s continue! This step is nice and simple but oh-so effective. Using the dark grey FC 181, shade around all of the markings so far, as seen below. You want to shade in the direction of the drape of the wings, that’s really important. Make sure that you cover all of the green, don’t let it poke through or your butterfly will appear to lack substance!

How to Draw a Monarch Butterfly Step 7
Step 8
It time to re-address the edges, it’s all in the details and these transitions are crucial. Using both the paynes grey FC 181 and burnt sienna FC 283, draw back over the edges where they meet around the orange. I use my pencils like blenders and this is what you want to do here. The idea is to work between the two pencils adding more pastel and swirling it into the previous marks until the lines are pleasingly joined together. You don’t need to press hard to do this – unless you haven’t already filled in the tooth of the card!
We can now block in the last section of our painting: the body. Let’s be honest with ourselves here, butterfly bodies are not the prettiest parts of the insect, in fact, their hairy abdomens creep me out a little. Hence, knowing that our areas of interest lay within the plush wings, we can keep the body simple.
Use, again, the paynes grey FC 181 and badly colour the edges and top shelf in, making sure no card remains.
Follow this with the burnt sienna FC 283, as seen below.

How to Draw a Monarch Butterfly Step 8
Step 9
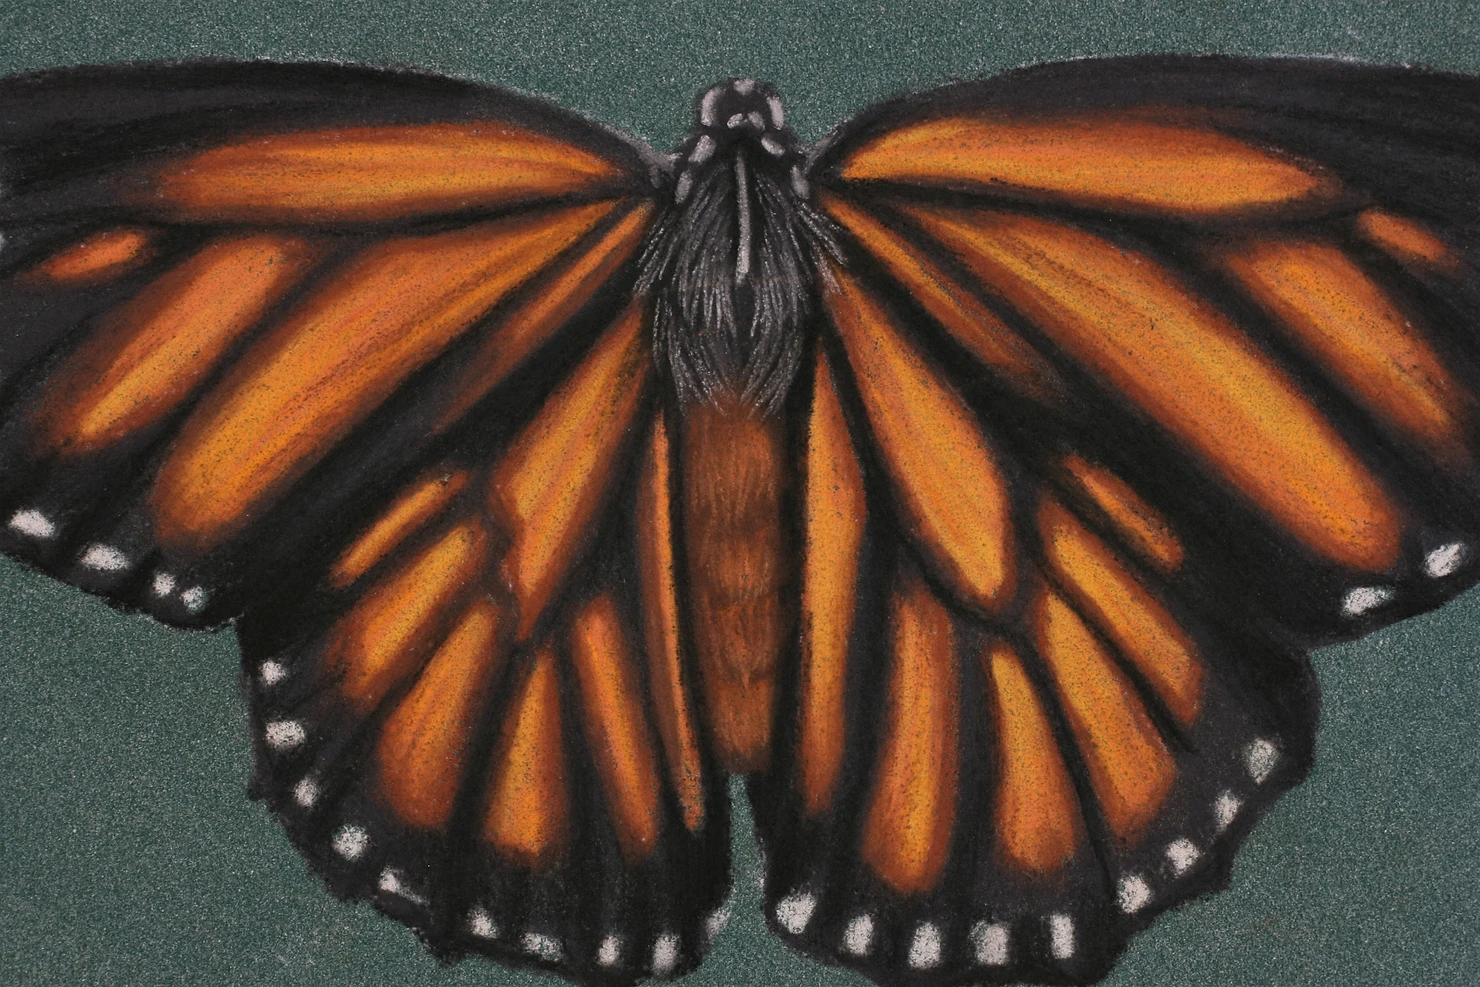
Switch back to the wings now. It’s time to add more depth and definition to the delicate folds we started on all the way back with the orange. This time, we are working in the dark blacks and for it will be using the black FC 199. You need to keep these lines flowing in the same direction as those within the orange section; try to match up the shaded dips in the orange with the back so that the fold flows through the entire wing.
You can see below that I have also darkened all around the body where the wings join as this is in deeper shadow.
How to Draw a Monarch Butterfly Step 9
Step 10
We are moving onto the finishing marks now, starting this the body. For this step, keep your pencils quite sharp so that you can achieve delicate lines for the hairs. If you think the hairs pop out of the page too prominently, simply tap them with the tip of a clean finger and they will fade back.
For the abdomen, start with the dark brown FC 177 and shade it darker around the edges and to form the ridges which cross the body. On top of this framework, use the peach-orange FC 186 to add in some fine hairs which should have a gentle curve to them. You’ll most likely see the hairs grouped with darker lines between each section.
For the thorax, darken the edges, if needed, to create a more rounded form. On top of this, use the mid-grey FC 270 – sharp – and add in some delicate hairs. Once again, these should have a curve to them and be soft.
You can see below I have also added a few marks to the head and eyes with the same light grey FC 230, you can copy these onto yours.
How to Draw a Monarch Butterfly Step 10
Step 11
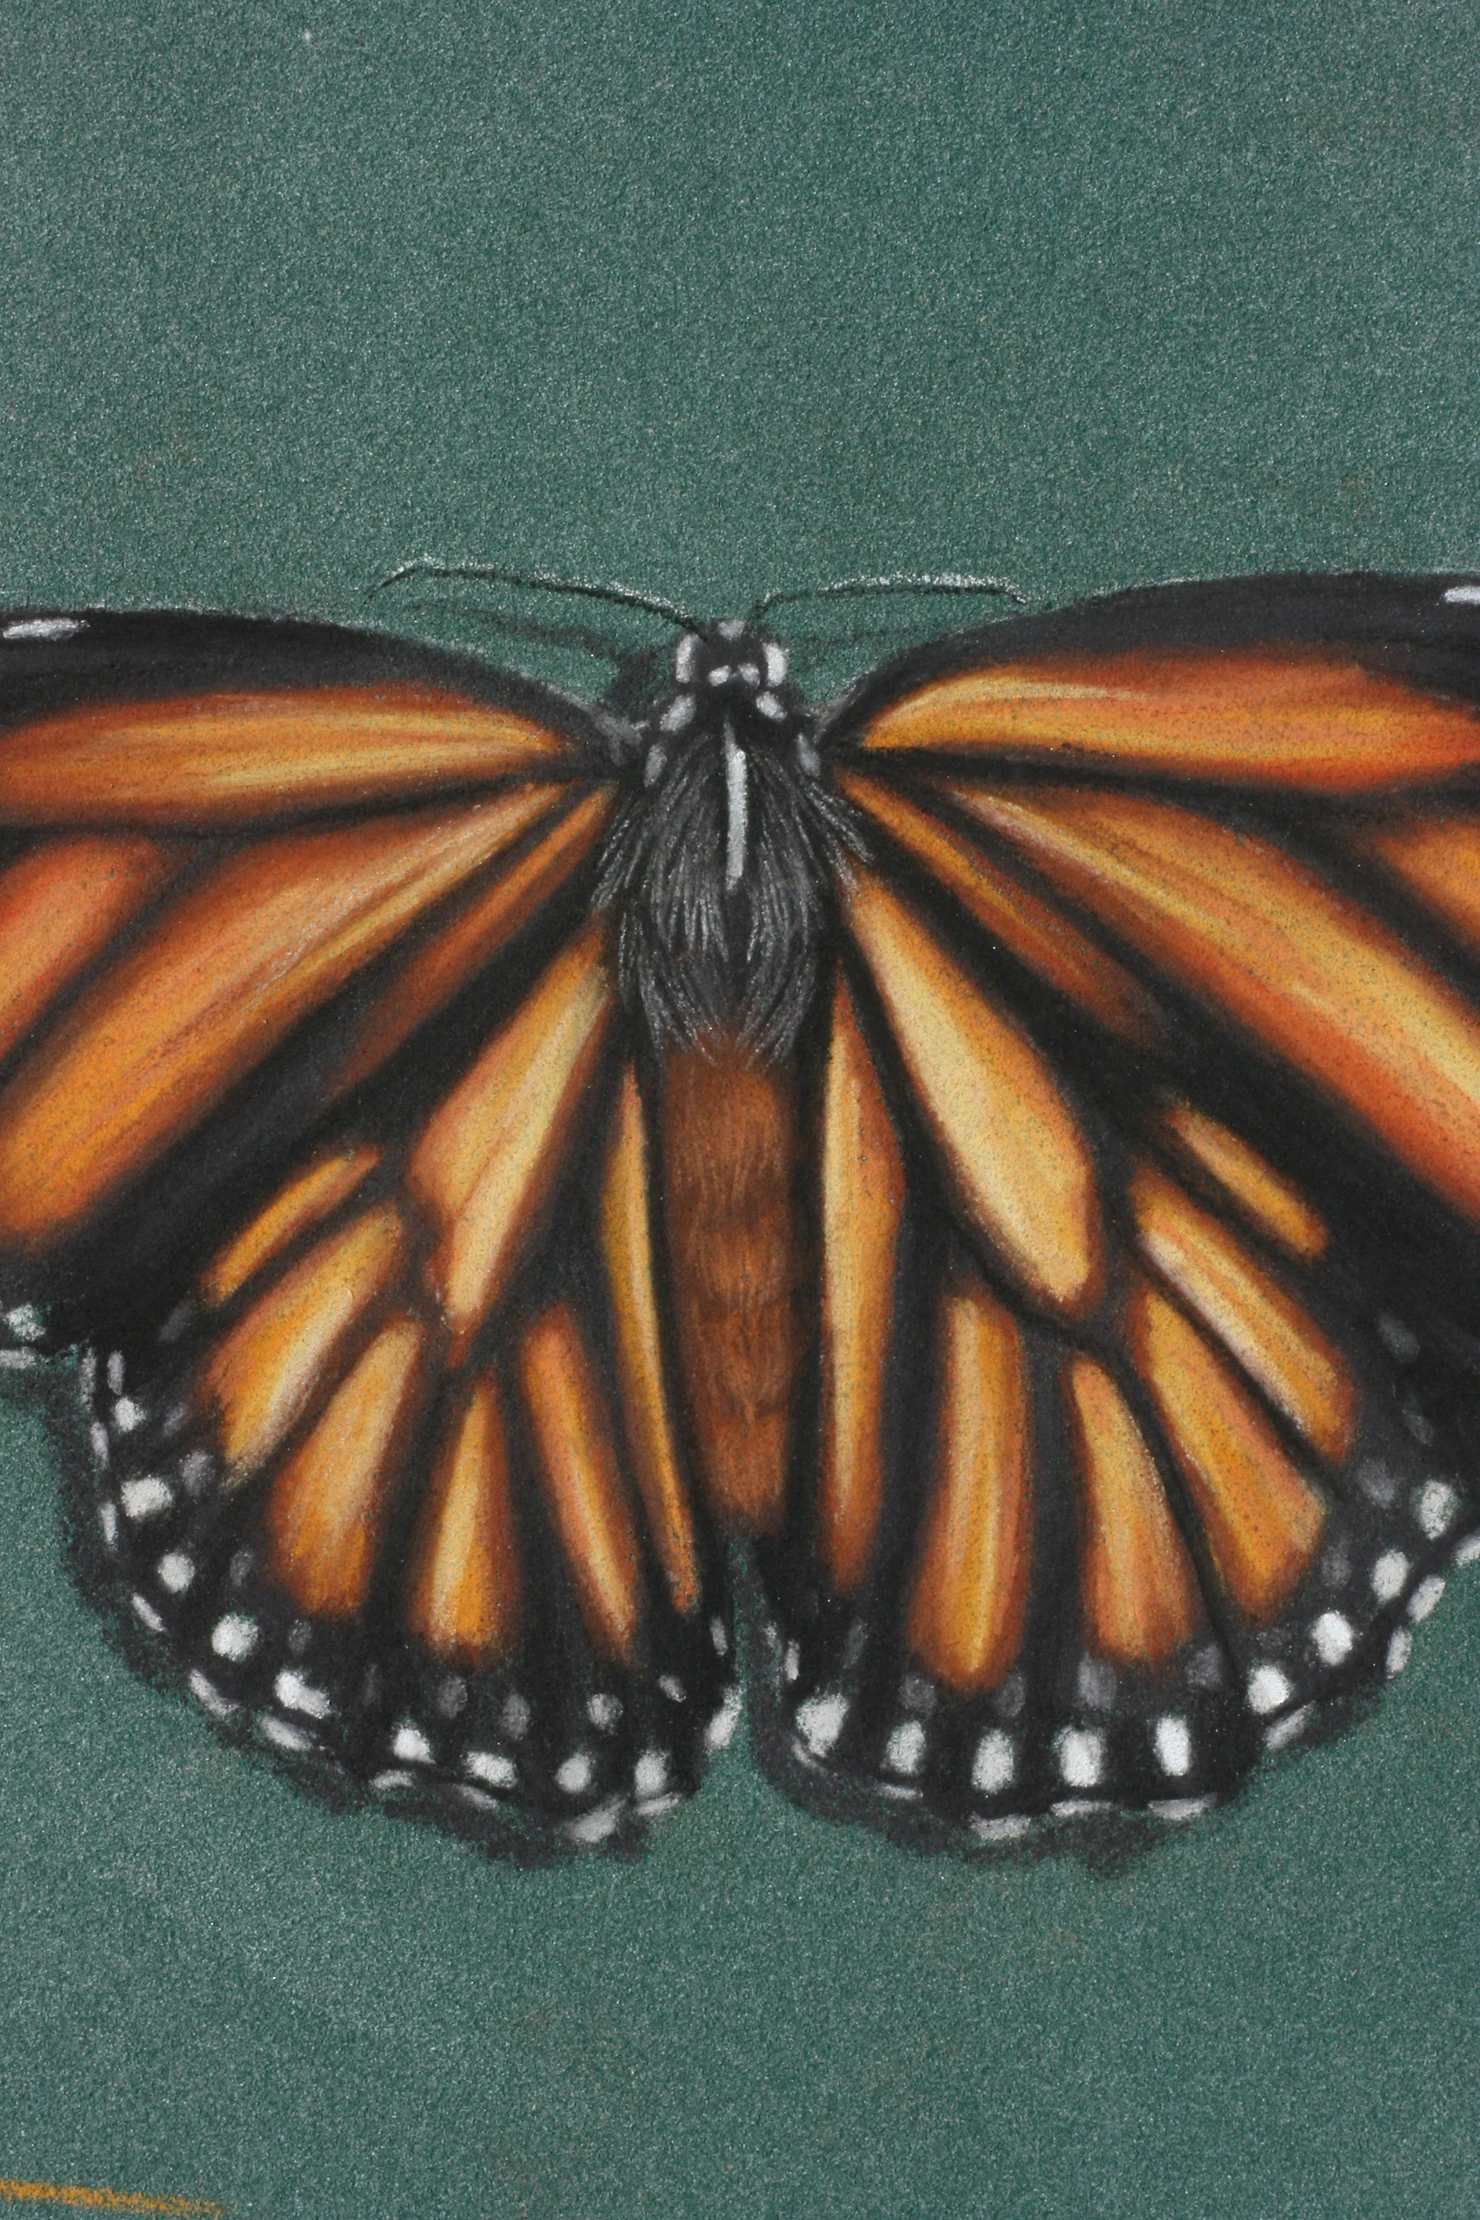
There are a few fun things to address in this step, it always takes your work to another level and is relatively simple to do, just have a good think before you begin.
Take the black FC 199 and sharpen it so that you can be careful and accurate. Draw in the antenna. To pick them out a little more, run the light grey FC 230 along the top edge to highlight them – ta-da!
Next, we will give this little Butterfly a bit more substance with a shadow. The shadow is always magic to add in if you get it right. This is where it is best to stop, think and then draw. Decide where you want the light to be coming from and think carefully about where this would cause a shadow to be cast on your page. Then, take the dark grey FC 181 and add in a soft shadow, I would keep it fairly small and not press too hard, either.
How to Draw a Monarch Butterfly Step 11
Step 12
There are still some small and slightly fainter marks to add into the wings before your painting is ready to flutter away. Start with the mid-grey FC 273 and softly softly add in those fainter markings which are just above the white trim you have already laid down. You can see what I mean below. While you’re there, mark in the white dashes travelling on the edge of the wing with the same FC 273.
Over the top of the dashes along the edge, add a touch of light grey FC 230 but careful not to make them too bright, especially those curving around towards the body which are in shadow.
How to Draw a Monarch Butterfly Step 12
Step 13
Penultimately, take the white FC 101 to add in our brightest sparkles on the whites of the wings. You want to give attention to the larger shapes on the top wings. Here, you’ll find an opportunity to continue the wave of the drape: some areas will be light grey and some white. So take your time, look at your source and the patterns on your wings already and see if you can work within them.
How to Draw a Monacrh Butterfly Step 13
Step 14
For the final step, use the ivory FC 102 to add in the brightest parts of the wings (within the orange). These should again be soft highlights, sweeping with the wings own drape. Careful not to over-saturate your painting, less is always more – but it does look rather good when you add it in!
If you’re unsure whether yours is finished, return to that list earlier, just check a few things:
- Have you got enough soft edges?
- Is you black pastel covering the card and sufficiently dark?
- Are the white markings clean and crisp?
- Is there a consistent pattern formed by the drape in the wings?
Stuck for where to begin?
Start with 4 free project outlines, ready to begin in pastel pencils straight away!
Keep your pastel pencil knowledge up to date!
Stay inspired and keep your pencil moving with inspiration and updates.
Don't worry, your information will not be shared.
We hate SPAM. We will never sell your information, for any reason.
